So you've migrated to Shopify and you need to pick a plan? Well, this is an easy decision because Shopify has baked in all core features into every plan. The biggest difference between plans is the discounts you receive on Shipping, Payment Processing, and how many users can access the admin with their own account logins. There are some other small considerations like reports and international shipping. But the overall system is the same for all plans and a few features that are determined by your companies structure are what is up for consideration. Let's dive in a bit further and go over what these areas are.
Check the Shopify Plans page for the most up-to-date pricing and details.
Here are the main factors that make each plan different. These are very specific to your company and not to the Shopify core functionality - like how many staff members need access and do you have a high revenue where the credit card rates are less expensive on a higher plan.
Most of our clients determine which plan they need by calculating the credit card processing rates and then subtracting the discount difference and the plan difference to see which plan makes the most financial sense. Some need one of the additional options above as well but the rates in most cases are the determining factor. That is why we've created a Shopify Pricing Calculator to calculate the exact pricing of your credit card processing fees when using your own processor or using Shopify Payments by Stripe. Check out our calculator today to see what your exact Shopify Pricing will be.
The Shopify reports are very useful and robust. Shopify has created a system that gives you the reporting needed to run an e-commerce business and factors reports needed for Marketing, Sales, Taxes, Traffic, etc. If you end up selecting the "Shopify" plan that includes reporting, the reports you can run in this plan are very complete. The Advanced Reporting included in the "Advanced Shopify" plan simply includes a way to save reports and a couple of other advanced reports for advanced users performing high-volume marketing campaigns. Take a look at a post we created about this very topic What's Included In Advanced Shopify Reporting?.
If you have many staff members logging into the Shopify admin to process orders, take phone orders, or manage your system then upgrading your plan is very useful. Each user can have their own login and you can see the activity and collaborate with each other on order notes, send emails to customers, and manage your POS, Online Store, and connected channels. Shopify includes their own live calculated rates for customers at checkout as an option if you want to activate it. In most cases, you do not need your own account because both integrations show the consumer the retail rates at checkout. But if you do need/want to use your own account then there are some options to add this functionality a-la-carte without upgrading to the "Advanced Shopify" plan. Check out our post about this very topic on how to use your own UPS, FedEx, or USPS account without upgrading your plan How to add Shopify Calculated Shipping Rates (Using Your Carrier Account) Without Upgrading Your Plan?.
Quality control crawling is important to make sure your Shopify migration is successful. We perform a series of crawling to ensure that all URLs are properly hopping to the final destination and to catch any URLs that are not linking properly to Shopify. This is the best way to see under the hood 100%.
During your migration, we are matching your pages 1:1 including Products, Collections, Content, Blog, Blog Posts, and Home Page. This includes the body content and all embedded hyperlinks, page metadata, alt-tag data on images, migrating image assets to the Shopify CDN and re-embedding the image into the HTML body, and 301-redirects from the existing canonical URL to the new Shopify handle.
Once all of the existing pages are created and linked on Shopify, the crawling can begin to make sure that everything is built out properly. Here are the crawls we perform to perform the perfect migration to Shopify.
There are additional crawls that can be performed for advanced websites to quality control check through other sources of data.
Getting your legal policies added to Shopify is easy but there are some things to know. Shopify has made it easy to add your Refund, Privacy, Terms of Service, and Shipping policies to your site. Just go to your Shopify admin > Settings > Legal. In this area, you can utilize one of Shopify's pre-made templates, modify if desired, and save.
Shopify requires for PCI Compliance a Refund, Privacy, and Shipping Policy to be added separately into the admin. So this means combined policies need to be split out. You can also add a Terms of Service, which is useful if you require customers to accept via a tick box at checkout (Shopify links to the policy).
Once your policies are added to your Shopify settings you will see them available in all areas of the system where you would link to those pages. e.g. Navigation, Theme Settings, etc.. You will find the policies in one of these various areas you link to pages under the "Policies" category.
Getting your sales tax setup in Shopify is easy but there are some things to know. You first need to determine which states you are legally required to collect and remit sales tax to. Once you have a list of those States you can simply enable them from within your Shopify Admin > Settings > Taxes.
1. Which countries do you collect Sales Tax from your customers during checkout?
2. In the USA, which States do you collect Sales Tax?
Shopify automatically calculates Sales Tax on the State level, and they use a live database to determine State, County, and City tax based on the customer's Shipping Address.
It is important to know that tax regions will only show up for zones created in your Shipping Profiles. Meaning if you do not ship to a location then you cannot collect sales tax for a location you do not ship. To add a zone to your shipping settings so the tax settings will appear, check out our blog on how to setup Shopify shipping profiles.
Once you add all the States required then Shopify will handle the rest automatically. You can run reports when it's time for you to file with the State and you'll be able to see each state and the totals you collected.
Getting your Shipping setup on Shopify is an easy task but there are some things to know. The Shipping Profiles first start with you selecting which products qualify for various shipping destinations like the United States, or Canada, and then the rates that are set for each of those destinations. A product SKU on the variation level can only be applied to 1 shipping profile.
It is important to understand that you are adding products to a shipping profile, then adding the destinations (Zone) by selecting each country and or states you ship those products to. Then adding rates to those various zones in which you can mix Calculated Live Rates, Flat, and Dynamic Condition-based rates to be applied to those zones.
Here are the steps that you will see when creating a shipping profile:
Step 1: What address are you shipping from?
In Shopify, you can add all your warehouse locations. Please send us the address(s) that you want to be added.
Step 2: Which States and Countries do you ship to?
In Shopify, you can select each and every country and State. Many businesses ship to (48 Continental USA, or 50 USA, or all 62).
Step 3: How do you want your shipping rates set up?
Options Available:
You can add as many of these conditions that you need and mix and match them.
Example:
Some of our clients will have Free Shipping on orders over $49 but then for expedited shipping like 2-day air, they will have Shopify calculate live shipping rates. Shopify uses weight and zip code to get those live rates that will display to the customer at checkout. Keep in mind these rates are separate from what you pay when you are creating a label.
If you are migrating your website to Shopify then you are most likely asking about your theme's recommended banner sizes. Many of the themes have recommended sizes inside each section area's settings. However, these are just best guesses as to what would work well within the frame. We've come up with a more universal number for the best banner sizes for your Shopify theme. Keep in mind that there are no set sizes. You can have a banner as tall as you want, whereas the width is restricted to the container and browser width.
Proportional sizing is good to stay within because if you make the banner tall then on mobile you will have a long scroll. If you make the banner too wide and short then you will barely see a banner on mobile. Check out our recommended sizes based on the industry common sizes for the Hero Banners, Featured Category Images, and Collection Images.
Hero Banner (Homepage): 1600X500

Category Images: (Homepage) 500X500

Featured Images: (Homepage) 885X680

Small Featured Images: (Home Page) 440X330

If you migrate your website with Pelican Commerce, these are the common tasks that we'll help you with to be sure your site is set up properly. We specialize in Migrating existing websites to Shopify while retaining the SEO Rank and Traffic. Reach out to us today if you need help or have any questions.
We get a lot of people that ask us how Shopify's URL structures work. The main confusion is that Shopify controls the first directory path. (e.g. /products /collections /blogs /pages). Having control of the entire URL structure is nice, but it is not necessary in order to retain your SEO when migrating.
Since the first path is not something you can edit, in most cases when migrating you will need to add a 301-redirect to link the OLD URL > NEW URL. However, if the first path on your existing platform matches Shopify's set (/products /collections /blogs /pages) then you can keep the URL the same by matching the second path to the Shopify handle.
If you are embedding a hyperlink to text in your descriptions around your website. Then it is best to not add the actual ROOT domain. Just put everything after the root domain. e.g. /natural-face-lift/ instead of www.yourdomain.com/natural-face-lift/


If you have any questions or need help migrating your website to Shopify while retaining your existing SEO traffic and rank, then reach out to us today!
Shopify's platform has its own payment option called Shopify Payments by Stripe. Part of that offering is the built-in Fraud analysis panel that you find on the order detail page. Since the payments are powered by Stripe, the Fraud analysis indicators are robust and focused on giving you the information needed to identify potential fraud.
Here are some of the indicators you will see on the order detail page for each order so you can properly investigate if the order is determined to be a Medium or High risk.

There are also third-party apps that have their own settings and tools to identify fraud. One of the great features of Shopify is that these apps will show the information right inside the same panel that Shopify shows their analysis. One of our clients uses "ClearSale" which is similar to insurance for chargebacks. The order gets reviewed by ClearSale and once they clear it, if there is any fraud then you are not liable for it. That is also built into the same Fraud Analysis panel on the order detail page as well.
We help companies replatform to Shopify and retain their existing SEO traffic when migrating. If you have any questions about Shopify's fraud analysis or if you're looking to migrate to Shopify then contact us today.
The Shopify platform is one of the easiest E-Commerce platforms to maneuver around and make changes to. But we find it to be easier if you have a quick overview of the basics. We are going to show you how to jump into your new theme and make changes to your hero banners and theme settings. Shopify has a live theme editor that will allow you to make changes. If you like the changes then click Save, if not then refresh your page to cancel any changes you've made. Additionally, you can duplicate your theme from the Actions drop-down and make changes, save them, and then publish that duplicates theme so it is the Live Theme when the time is right. This is a useful way to stage your theme changes.
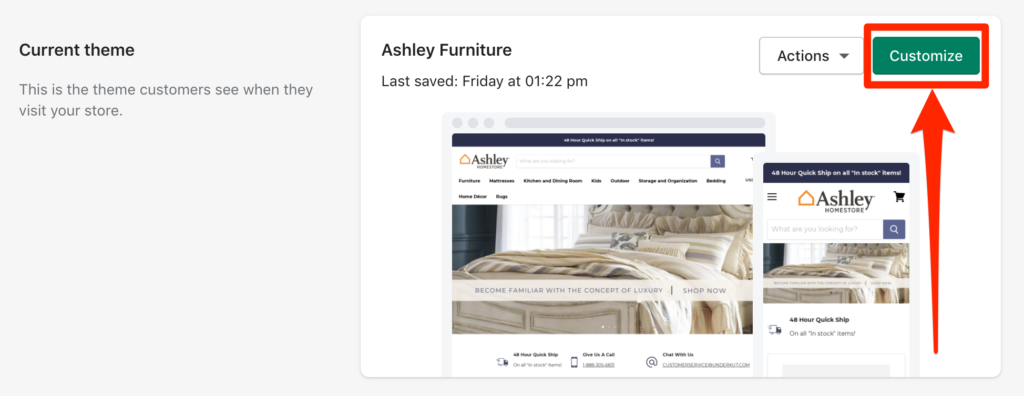
First, login to the Shopify store admin > Online Store > Themes > select "customize" next to the proper theme on your right-hand side where your "Live Theme" is published.
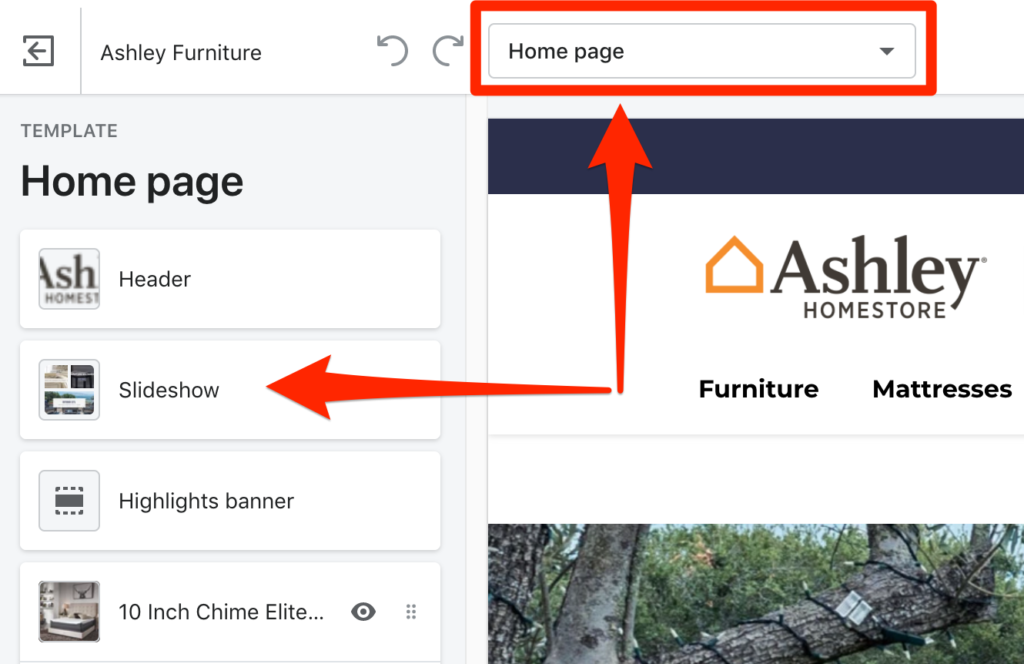
Once the theme editor has loaded you are going to see many options on your left-hand side. These options are for the selected page type (Home Page opens by default). Look towards the top of the page where you will find a drop-down that says "Home Page" and click to see the various page types. This is where you will first select if you want to edit Home, Product, Blog, and various other page types. Once selected, you'll see the editor change the blocks on the left-hand side, where you can then modify the selected page.
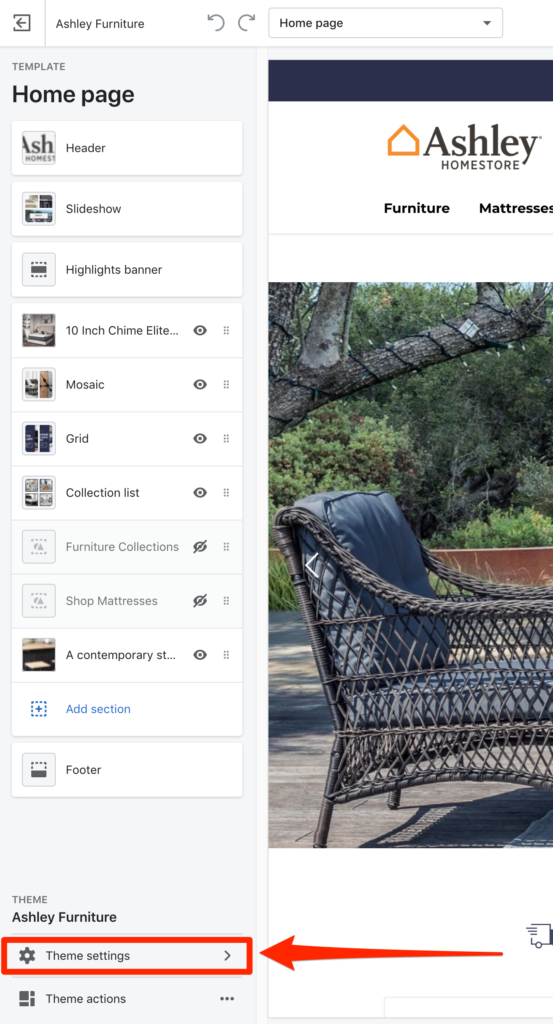
In your theme settings you will find areas that touch all page types like fonts and other system settings related to the themes controls. Here are some of the common areas you will find in the theme settings area found in the lower left-hand corner of the theme editor area.
The most common question we're asked is "How can I change the graphics on the home page". This is a very simple task. Once you're in the theme editor you will select "Home Page" at the dropdown at the top of the editor. Once you have selected Home Page you will see various sections on the left-hand side. Select "Slideshow" and then you will see in the "Content" area the various Slideshows. You can add many slideshows graphics and change the duration settings within this area.
If you have any further questions about how to edit your theme then reach out to your project manager today.
Having the best branding on your website is key to gaining trust from your customers. Sometimes that can be as easy as picking a really nice font for all your headings. This is a simple and in most cases free way to make a big impact to your design. Shopify themes have the ability to install custom fonts. You can license fonts for free in many cases and spice up your design instantly. Learn how to upload, and apply a custom font to your Shopify store below.
Step 1: Log in to the Shopify store admin and go to Online Store > Themes > and next to your theme, select "Actions" > Edit Code.

Step 2: The best way to install your font is to use a WOFF format. However, you can use many web formats. On the left navigation go into the "Assets" and click "Add a new asset". Select your font file and click the "Upload asset" button.
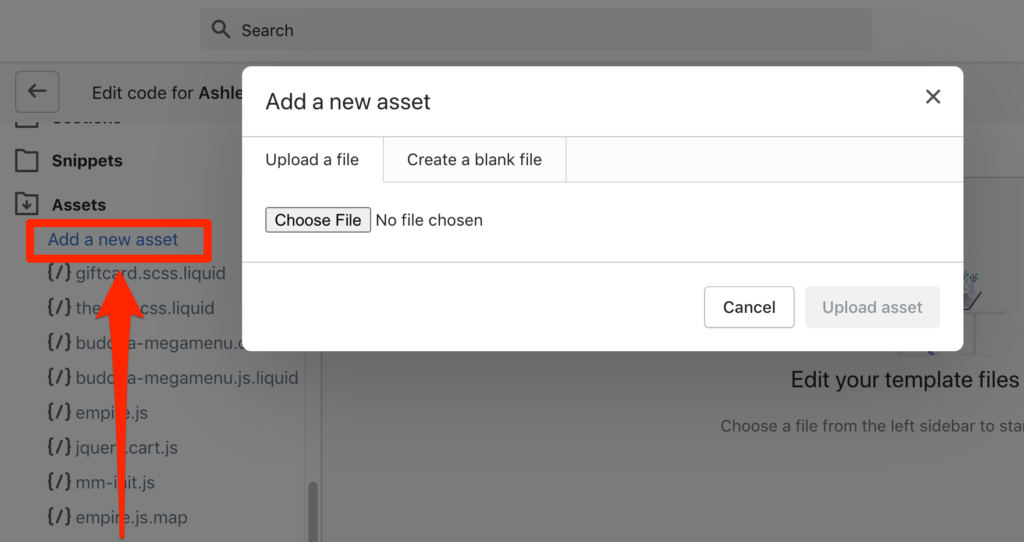
Step 3: The next step is to find the global CSS file. Each theme is different but its not hard to identify which file has the "css" in the name. Go to the Assets area and look for something similar to "theme.scss.liquid".

Step 4: At the very bottom of the css file you will paste in the following code. Replace the name of the font file that you uploaded to the assets area in Step 2 above where you see "Font-File-Name".
 @font-face {
        font-family: 'Font-File-Name';
        src: url('Font-File-Name.woff') format('woff'),
        font-weight: normal;
        font-style: normal; }

h1, h1 a, h2, h2 a, h3, h3 a, h4, h4 a, h5, h5 a, h6, h6 a, #nav li a, div.title a, .headline, .subtitle { font-family: 'FontName' !important; }
Step 5: Click Save. This will auto add your new font to the headings in the code. If you want to modify the headings this font applies to then remove any headings you don't want it to apply to.
Note: The font option will not show in your themes typography settings. The font must be controlled from the themes code if you want to modify it moving forward.
If you have any questions or need help with this then reach out to us today!
If you've recently migrated your website or you're just looking to perform a quality control check of your Shopify website, then run a broken links report. This report will allow you to crawl your entire site and the crawler will check through all links on all pages. This means images, embedded URLs linking to related products or even links in your descriptions linking to other pages or external pages. This will allow you to fix broken 404 links which is great for keeping your Google Rank healthy.
This is also a very important quality control check that we perform during and after our website migrations. We help companies migrate to Shopify and retain their existing SEO Traffic, Rank, and Authority.
Step 1: Open Screaming Frog and enter the URL to the website you want to crawl and click "Start".

Step 2: Once the crawl is complete go to the "Response Codes" tab, then filter to "Client Error (4xx).

Step 3: Highlight the results in the top window that you want to see the broken links for. You can click on one at a time or highlight multiple to export to a spreadsheet.

Step 4: Click on "Inlinks" or "Outlinks" to filter the broken link types. Inlinks are the links on the page that point to other internal pages on the website. Outlinks are the broken links that are pointing to an external link.
The crawler is hopping all of these links to see what the status code is. If the code comes back as 404 (Broken Page) then you will see the links in this list.
If you need help migrating your website and keeping your existing Google Traffic, Rank, and Authority
Logging into your new Shopify account is easy. If your email was used on any other stores you may have, then you can switch between them easily using your single login.
Step 1: Find the Shopify admin URL. It will have .myshopify.com at the end of it. e.g. https://ashley-furniture-florida.myshopify.com
Step 2: Enter your email address and click continue. - This is the email that you used when accepting the Shopify invite originally.

Step 3: Enter the Password. - This is the password you used when you accepted the Shopify Invite originally.

Step 4: Click log in!
If you forget the password to your Shopify account, then follow the instructions above, but instead of entering your email and password, click "Forgot password?" and follow the steps to reset your password.
Pelican Commerce does not assign your password, you will need to retain and save your login. You're responsible for retaining and managing this information.
When it comes to product options within Shopify, the out-of-the-box platform has a few limitations. This will limit you to 3 Options and or 100 Variants. The workaround for this is using a Product Options app from the Shopify App Store. Our team at Pelican Commerce has gone through and tested quite a few of these apps and we found that Advanced Product Options by MageWorx has been the best bang for the buck.
The Advanced Product Options app lets you create templates and assign them to their appropriate products. These templates can be assigned to multiple products. This helps with keeping product options across your Shopify store looking uniform. Below, I will be providing you a step by step on how you will go about creating these templates and assigning them to your products.
To begin, you will want to navigate to your Advanced Product Options app. From your Shopify Admin Homepage, you will want to click on Apps > Advanced Product Options.
To create a new Product Custom Options template, click the Create New Template button. The template builder will have three sections, Template Information, Product Options and Assign Options to Products.
Template Information will give you the option to fill out a Template Name, Status, Sort Order and Template Image. I will go into depth on these below.

Creating a new product option is quite simple. You'll start by clicking 'Add New Option'. This will display a bunch of fields of which you will be able to populate, if necessary.


After you are done creating all of your options, be sure to save your template. Once you've saved your template, you will scroll to the bottom of that template page and find 'Assign Options to Products'. This section will give you the ability to search for your products and assign that template to them by clicking the check box next to it.

If you have any further questions about how to make changes to your product options app that we setup for you then reach out to your project manager.
Shopify has one of the most simplistic interfaces in the E-Commerce space to manage your products, customers, and orders. But with simplistic interfaces comes less functionality. But Shopify has been able to strike a balance between simplistic and robust with their Metafields database. This database functionality is hidden behind the scenes of your store and requires the use of the Shopify API to add data to is. But luckily, many app developers have created both free and paid apps that give you the interface to manage right within each area of your store and also with bulk importing abilities.
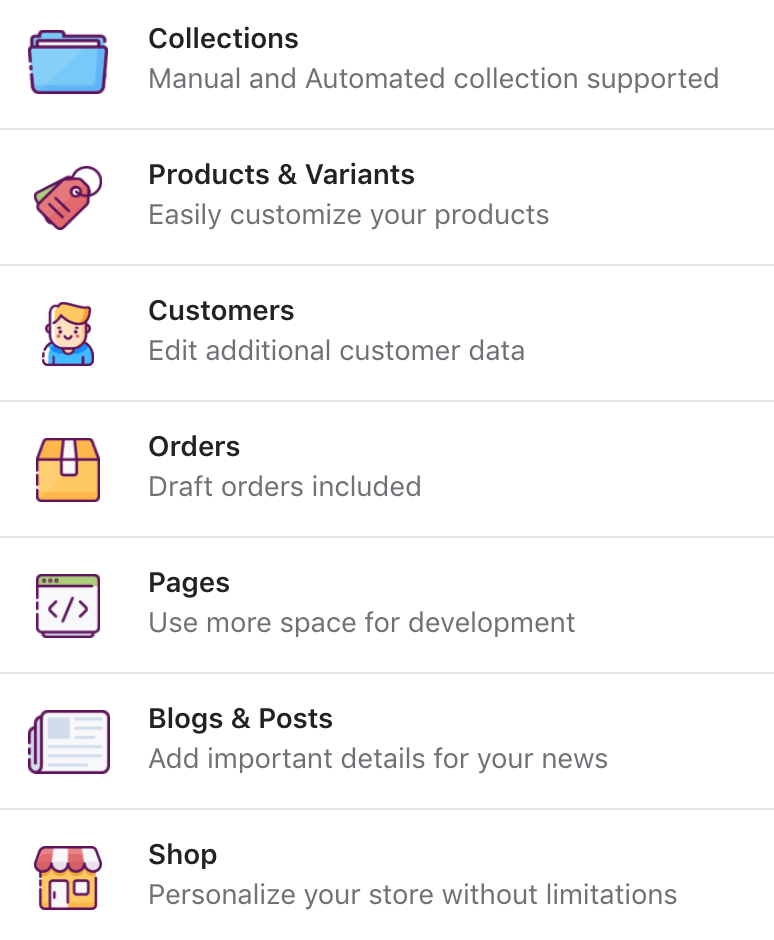
Shopify Metafields are custom fields for Products & Variants, Collections, Pages, Blogs & Posts, Customers, and Orders.
Lets say you have a grid of product attributes/features in your product descriptions. You can always create one of those by hand in HTML using the Shopify description editor. But some stores process large imports of product data and need a way to place those attributes dynamically. That is where Metafields is useful. You can upload those attributes to your Shopify store and display them dynamically in your descriptions or anywhere you want on the product detail page. The design of how they look, where they are placed, etc can be completely controlled.
The catch is that although the app is easy to use and easy to import bulk data into. The dynamic code must be added to your theme and styled the first time for each area on your store. Meaning if you want product attributes on your product detail pages. You will need to grab the key code from the app and then place that and style it in your themes code and then after that you will see it auto display. It's not hard but in many cases requires a developer to place the code properly.
If you've migrated your website and used Pelican Commerce, then there is a chance we used Metafields to populate data on your stores pages. Not all products need this so it is decided by your project manager if it is necessary. To check and or manage Metafields, follow the steps below.
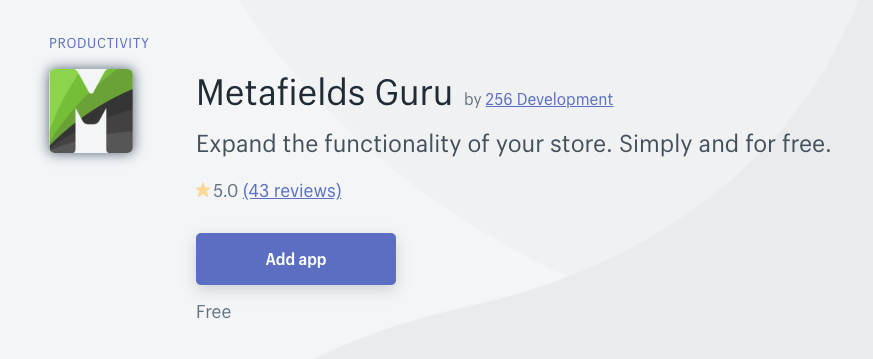
Step 1: Install a Metafields app. We like "Metafields Guru" because it is simple and free.
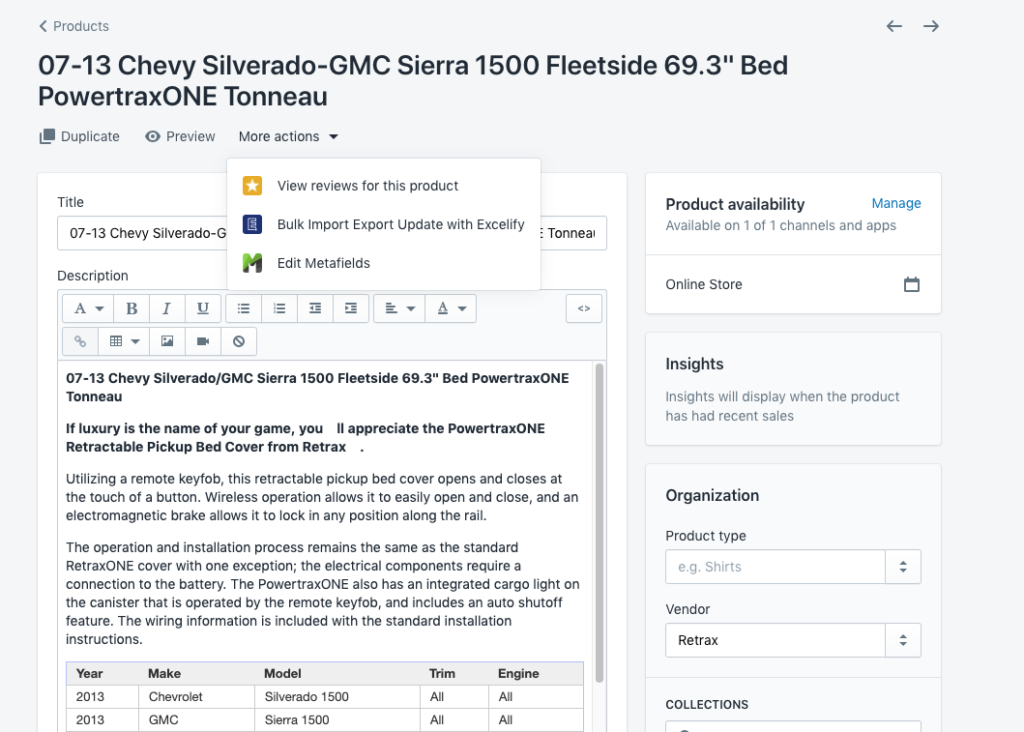
Step 2: Go to Products > Select A Product > when you get to the product editing page you will see "More Actions", click on this dropdown > Select "Edit Metafields".
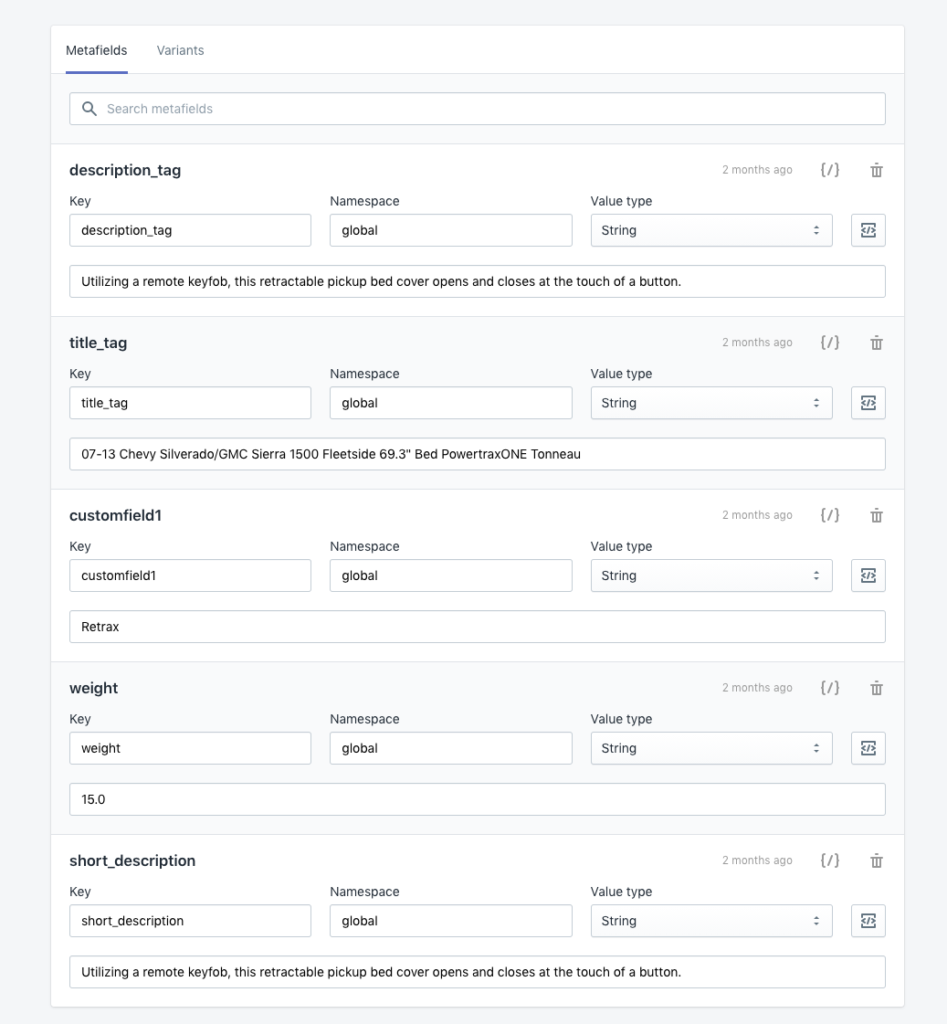
Step 3: You will see various fields of data if they were used. If you see data in this area, then that data is for this very specific product you are editing. Keep in mind that if the code to display this data is not added to your theme then you will not see it on the live website.
These custom database fields can be used on your Products & Variants, Collections, Pages, Blogs & Posts, Customers, and Orders are of Shopify. This means that you can add custom data fields to your product pages, to your customer accounts area, to your collection pages, etc.
If you need help bulk uploading custom fields to Shopify and mapping the data to your Shopify theme then reach out to us.
Migrating from a platform like Magento to Shopify is a difficult decision to make. As a business, you must take into account all the benefits that each platform offers and, at the same time, consider your migration options to guarantee a safe process that doesn’t have a negative impact on your traffic.
Magento is one of the most recognized platforms worldwide with approximately 50% market share in the E-Commerce space. Magento stands out for offering an open-source platform that is developer-centric. The platform can handle unlimited variants for large catalogs, and if you have multiple websites then the multi-brand stores ability makes having one database for multiple stores a great solution. One of the biggest reasons businesses use Magento is Enterprise support. The platform with the right servers can handle large E-Commerce players and that is a must for big businesses.
We commonly hear from our clients that they're tired of relying on a developer to make any little change they want which is one of the biggest downsides. Although Magento has a vibrant developer community, that does not make financial sense for many businesses when it comes to small changes. We also hear that the expansion of the store can cause more problems than it solves when installing new apps. This poses a problem for businesses that are busy, and want to be more profitable.
Shopify has rocked the E-Commerce space by building a platform rather than just software. Rather than having your own servers, IT person, developer, etc. You can log in and everything is taken care of for you when it comes to Servers, Security, Software Updates, and Shopify has 24/7 Phone, Chat, and Email support. But the main reason we see everyday business owners choosing Shopify is the well-thought-out consumer and admin experience you get with the platform. The system is easy to use, and a productive environment for your staff to manage the store, online selling channels, and orders placed on any of the connected channels.
Shopify has many benefits but the biggest ones we hear of on a daily basis is that people like the freedom of being able to install apps, manage their own store design, and the ease of use for both the consumer and for their own team to keep everything up to date on their own.
Pelican Commerce has spent the past 5 years building the most comprehensive migration service, helping business owners re-platform to Shopify without losing their existing SEO Traffic, Rank, and Authority. Our service starts with an API Push, a front-end crawl of your website to capture the rich SEO data, and a snapshot of your database. We combine those three sources of data together to create the richest dataset available to use in your migration. We then set up your theme, apps, store settings, and make sure all the 301-redirects are in place to point to the matching pages on Shopify. Once everything is in place we handle the launch of your store with zero downtime or interruption to your business.
If you're considering migrating from Magento to Shopify or Magento to Shopify Plus, then contact us today and chat about moving your business to the most modern E-Commerce platform in the industry!
Every day the percentage of merchants looking to start selling online or migrate their existing business to a modern platform increases due to the massive shift in E-Commerce. Especially as social distancing has become an everyday thought to the consumer. It just makes sense to go digital and offer a hybrid experience of online and brick and mortar retail.
A friendly user experience and ease of use are just some of the benefits that allow us to consider Shopify one of the best options to start or migrate your existing online business. Shopify's platform is recognized worldwide, with more than 1.5 million active businesses in approximately 175 countries, and with a 20% market share in the E-Commerce platform space.
Shopify stands out for including within its service more than 1,400 apps that will expand the functionality of the out of the box system and help you keep control by eliminating the need for a developer. They offer a robust built-in metrics and insights system to help you understand the performance across your store and also the connected selling channels like Facebook, Instagram, Pinterest, POS (In-Store Sales), etc. This includes the number of visitors, customers, and sales happening in real-time on your website. Shopify is a platform that has merchants generating revenue as high as 500M dollars in annual sales, making them a player in the enterprise E-Commerce market with their Shopify Plus platform.
Migrating your website to Shopify can leave a lot of wondering if everything is set up, moved, and being utilized in both the industry-standard ways and using Shopify the way it was designed.
Pelican Commerce is a team of Shopify Experts that specialize in getting businesses migrated to the platform the right way. We design well thought-out services that have all the necessities big and small baked into the core scope of work, specifically for the Shopify and Shopify Plus platform.
As a service provider, we take care of offering an integrated service, which not only includes the migration of the data (content pages, products, collections, discount coupons, images, variations, or descriptions) to achieve a 1:1 page-for-page match but also, we take care of performing the corresponding 301-redirects to migrate the existing SEO Traffic, rank, and authority, to avoiding losing all the links and information of your existing website (which, if they are wrongly managed, they can completely destroy the traffic to those pages on the Shopify side). Since we've migrated hundreds of companies to Shopify, we've designed the most robust scope of work for an end-to-end migration that is seamless from the start of your project to launching your new store and training your staff on the new system and functions.
Explorer the possibilities of re-platforming your existing website with us and get moved to Shopify or Shopify Plus!
This year has been the busiest year for us to migrate Volusion stores to Shopify. Our clients have all had their reasons for wanting to leave Volusion, but the bottom line is they don't trust the direction the platform is headed. So we have spent a lot of time working with these established businesses to get their robust setups migrated to the Shopify platform, the right way!
Getting moved to Shopify is a big task because of the simplistic interface and the robust app selection allowing you to expand the functionality of the store. A lot of the built-in functions in Volusion require an app on the Shopify side. But most of the time you just need a few key apps to get back to where you were and any other apps you may want is merely to grow your store on the platform.
The first thing you will need to do is to compare your current Volusion functionality to the built-in native functionality that Shopify offers. This is necessary to see if you need any apps to keep your store functioning the same on the other side. Here are some things to consider:
These are the big structural decisions that need to be considered because they do require an app. We commonly see that people have many of these options on the Volusion side and the apps you select are critical because you will be using them anytime you need to update your products. So making the best decision possible for these apps are important in the long term.
If you want to move your customers and orders to Shopify then you will need to first get the total customer and order count from Volusion. (check out our blog post here that explains how to see how many products, customers, and orders you have in your Volusion admin). Once you have these numbers, then it is easier to get a quote to transfer the transactional data. Shopify requires transactions to be imported via API. This is something we can help you achieve when you're migrating your customer and order data.
If you have an established website with high ranking authority, rank, and existing traffic, then you're going to want to follow Google's strict process to get moved to another platform. The secret sauce for retaining your SEO traffic is to match page for page 1:1 on all product detail pages, collection landing pages, blog pages, content pages, and your home page. Matching the metadata on-page and putting the canonical URL into a 301-redirect to the new Shopify handle. We have an extensive process for our clients that also includes custom crawlers, and hopping through all URLs on-site to be sure there are no 404 errors which is what overall is bad for your site.
We help small businesses get migrated to the Shopify platform. Volusion is a platform we spend a lot of time moving people off of and our well thought-out process is a must for businesses that rely on their organic search traffic and that require full-service to get moved, setup, and launched. Reach out to us today for more information about moving your business to the Shopify platform.
It's an exciting time to launch your new Shopify store and to have all your existing website content on this modern platform. There are some things to know when going for launch that are useful and in some cases can prevent hiccups during the process. Have a look below and if you see anything that you have questions about then reach out to your project manager and we'll go over everything with you.
If you currently have professional email hosted on your current server then there is a chance after you launch on Shopify that you'll end up losing your email after shutting down your old server. You may want to contact your hosting company to be sure. Here is what to ask...
In some cases the email software is part of your website software. In that case you will lose your email access. If your host offers email as an add-on then you should be able to keep that separate and cancel just the website hosting plan.
If you need to migrate your email then ask your project manager about our Email Migration and Google Workspace setup service.
If you're migrating your customers and orders to Shopify then all your accounts and the order history will be added to your new store. You will then want to Bulk Invite your customers to their new account. We can assist in bulk sending customers an email to activate their account. This process will happen after the store is launched for more than 24 hours.
If your domain name records are hosted somewhere other than the registrar you purchased it from then we will need to switch your name servers, rebuild your records, and then launch your site. If the registrar is hosting your domain name records then we will simply make 3 changes to your records.
When we switch your domain name records we are constantly checking the public DNS Propagation to make sure the new records are picked up around the main internet hubs of the world. This can be a pretty instant process. However, not all computers cache are cleared causing some traffic to continue to flow to your old website for up to 24 hours.
After your website is launched we will go in and re-submit your Shopify sitemap to your Google Search Console account. Please provide access to Google Search Console to [email protected] prior to your website launch.
We perform a series of QA crawls to plug up any broken links on your site. Here are some of the crawls and reporting we perform, review, and compare to make sure all of your traffic is hopping and flowing smoothly.
The goal is to be sure that Old URLs hop properly to New URLs. If any on site URLs linking to other pages on site or externally flow to a live page. Also the links to all accessible pages on site do not lead to a 404.
Automated migration tools can work great, but they are short-of complete. These plugins and platforms like Cart2Cart and LitExtension will transfer your product data as-is, create collections, orders, customers, reviews, etc. Each platform they service has a list of which data points they can move to Shopify. But there is a lot they absolutely cannot do and here's a list of the various things that will not be migrated using one of these API Tools:
If you have a simple migration, then using one of these self-service tools may be a good fit. But, be prepared to handle the other half of the setup. If you're looking for a Full-Service scope of work that covers all aspects end-to-end, then reach out to Pelican Commerce to go over your migration project.
One of the great features of Shopify is the Store Pickup feature for businesses that have Brick and Mortar locations. Activate this feature to have this option displayed at checkout for your local customers to pick up from your store.
The first thing to consider is the locations you have set up inside Shopify. If you do not have your store locations setup, then head over to your Shopify Settings > Locations. Inside this area, you can add each of your store locations, so they are available for your customers as an option at checkout. It is essential that each location has inventory for the items you want available for pickup, or they will not show as available for the pickup option at checkout.
Now head over your Shopify Settings > Shipping and delivery. Inside this area, you will see an area called "Local Pickup." Enable local pickup and select the options that fit your pickup process.
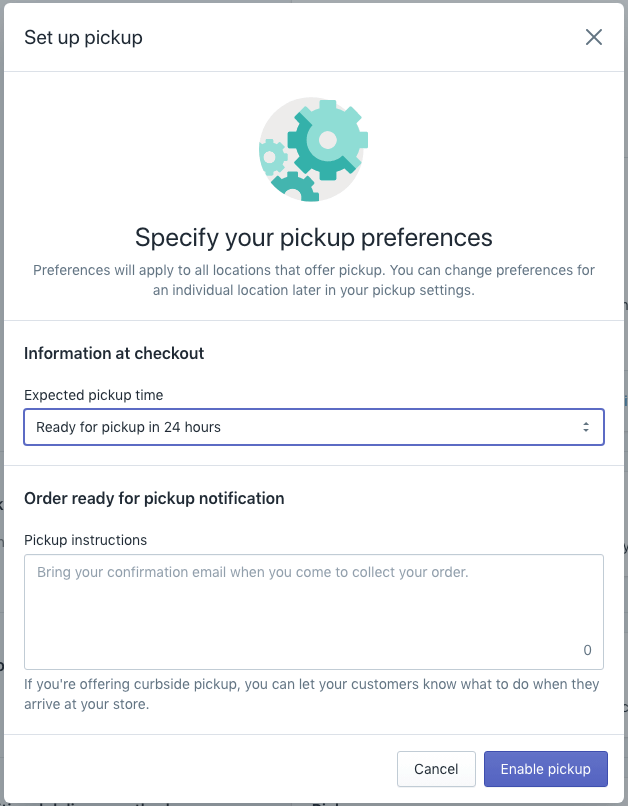


Once you enable local pickup or curbside pickup, your customers will see in-stock items available at the locations activated.
Keep in mind a few things:
If you need help setting up your locations, adding inventory to those locations, and enabling your local store pickup or curbside pickup, then reach out to us anytime.
A common problem with many of the themes on Shopify is that they free flow images height to 100%. The width of the image is limited to the container on the page. This method can create uneven image heights on your category landing pages, search results pages, and even a way too tall product image on the product detail page.
You have many options, some more desirable than others. But it is going to ultimately depend on your technical skills if you are trying to edit an extensive catalog of images in bulk. Here are some methods we commonly use at Pelican Commerce to fix the Shopify image aspect ratio in bulk.
1. We use a method to bulk download all images into a single folder from the Shopify store. We resize the aspect ratio in a local program in bulk to have square 1:1 ratio images (where the blank space on the longest side is filled in with white space). Then we add all the images to a temporary image server to create a hosted URL. We then use those URLs to map the images to the bulk export file from Shopify to replace the existing images with the new images. The first time we upload the file with the external server URL, Shopify uploads them to the Shopify CDN, and then that URL is never needed again.
This method is a more technical method to work with images in bulk and requires a fair amount of excel experience.
2. You can edit the theme code, which can proportionally resize the aspect ratio to display square images. You can have the code of your theme modified to force all images to 1:1 ratio on Search Pages, Collection Pages, and the Product Detail Page. Also, don't forget about items displayed in sections on the home page. All these areas need to be coded to force the aspect ratio. The key is a "Proportional Resize" of the aspect ratio to make the images square.
3. You can crop each image to be square in a local or online program. The most popular tool would be Photoshop, or if you have a lower volume of images, then you can even use your phone to edit pictures and crop them to a perfect square.
If you are looking for help bulk editing your images, then we can take care of it for you. We offer custom code options to auto-correct the aspect ratio or image asset modifications in bulk to adjust the original images. Contact us anytime for more information.